Showing posts with label syntax. Show all posts

Sunday, February 26, 2012

Spotlight on Linguistic Tools: Syntax Tree Generator

A fellow linguist recently shared a link with me for another online tree-diagramming program--one that I think is definitely more user-friendly than the other online programs that I've tried out. It is the Syntax Tree Generator. The Help page states that the program works best with Google Chrome--I've tried it on Firefox, Safari, and Opera without any issues. If you are on Google Chrome when you go to the website, you'll see a screen that looks like this:

Initial screenshot of Syntax Tree Generator

The screen changes just a bit if you use other browsers (e.g., the sliders for font and spacing are boxes for numerical inputs), but the overall design is still the same. The text box at the top is where you put in the information that dictates what the tree will look like.

Text box for diagramming
The sentence in the above screenshot is what you see when you first go to the website. You can play with that sentence or put in your own new sentence entirely. I'm using my own sentence for the examples below.

The basics of this program is the use of bracketing to mark constituents and embedding. The mother node label is the first entry after the open bracket, and a space after that label will result in a branch to a daughter node. The cool thing about this online program is that the diagram on the page follows what you type in the text box in real time. In other words, as you make changes, the diagram changes along with what you type, and you can see if what you type is what you had intended for the diagram.

One of the first features that is handy is the ability to diagram with triangles, which is indicated by the asterisk (*) after the mother node; for instance, if I type in [S* The dog is sleeping], I get this diagram:

[S* The dog is sleeping]
If there are no brackets within the original set of brackets, there will be no daughter branches. If you take out the * after the mother node, the triangle will turn into a single branch:

[S The dog is sleeping]
Again, the program reads whatever comes directly after the opening bracket as the mother and anything following it as the daughter. Even though four words (with spaces) follow the mother node, there is only one branch because there is only one set of brackets.

By adding brackets, you can add more daughters to diagram; the following diagram is made with the input [S [NP* The dog] [Aux is] [VP sleeping]]:

[S [NP* The dog] [Aux is] [VP sleeping]]
Now the mother node S has three daughters because there are three sets of open and closed brackets inside the S brackets. Each of the daughters in this example have only one branch (or one triangle). Each daughter can be expanded by adding more sets of brackets within it. The following diagram is [S [NP [Det The] [N dog]] [Aux is] [VP sleeping]]:

[S [NP [Det The] [N dog]] [Aux is] [VP sleeping]]
The difference with this diagram is that the NP node has been expanded to have two daughters; that's because the NP brackets now have two sets of brackets--[Det The] and [N dog]--inside.

Nodes can also be "uni-branching", as in the following diagram:

[S [NP [Det The] [N dog]] [Aux is] [VP [V sleeping]]]
In this case, the VP node now has the daughter V, which then branches down into the text node sleeping.

By using the bracketing method, sentences can get more and more complex. Again, the wonderful thing about this is the real-time diagramming that follows the input in the text box. Whenever you have a diagram you want to use in a document, simply right-click the image and copy it. Then you can paste the image into any document you need.

Another nice thing is that you can download the app for offline use by going to the Wiki page and clicking on the download link. After downloading the .zip file and unzipping the file, you'll see the following in the downloaded folder:

Downloaded folder for offline use
Click (or double-click) on the index.html (which is highlighted in the image above), and an offline version of the webpage will open. It's routed through your computer files, so you have full usage of the program without needing internet access. You need all the other files in the folder in order for the program to work without being online, so you need to keep all those together.

Have fun diagramming!

Updated note: The designer of this app updated the look, so the screenshots are a bit dated. The new look is incredibly sleek and even more user-friendly. I highly encourage you to check out its new look: http://mshang.ca/syntree/.

Thursday, February 2, 2012

Spotlight on Linguistic Tools: Linguistics Online Playgrounds

Linguistics Online (or 'LiOn') is a website that was developed as an online supplement for linguistics students at Utrecht University. One of the components of the website is the Tool Playground; in the Tool Playground are two incredibly valuable resources for many linguistics students: the IPA Keyboard Playground and the Treebuilder Playground.

The IPA Keyboard Playground is exactly what it sounds like: another online IPA keyboard. The keyboard is organized in the consonant and vowel IPA charts but doesn't have all the diacritics and more obscure IPA symbols (like those for clicks). Since many students don't necessarily need the extra IPA symbols, this keyboard is more streamlined for ease of use.

LiOn IPA Keyboard Playground screenshot

When using the keyboard, you can (as with other online keyboards) simply type into the text box (which for this one is situated between the consonant and vowel charts, which helps to visually separate the two). When you need a symbol you can't type, you simply click on its button in the chart, and the IPA symbol will be inserted where the cursor is. When you've finished with what you'd like to type, you can then copy and paste the text directly into your document on your word processor of choice.

The layout of the IPA Keyboard Playground is accessible and visually appealing. The text box isn't as large as the text box for some of the other online IPA keyboards, but often when we're typing in IPA, we're typing one line or one utterance (or even one word) at a time, so you may not find that to be a downfall. If, however, you want to enter multiple lines of text in IPA at once, you won't be able to put in a line break in this keyboard. Remember that online keyboards are all about functionality--you may find that you like to use one online keyboard for one task while you prefer a different one for another task.

The Treebuilder Playground is also what it sounds like: an online tree diagramming (or tree building) program. This online system is not as intuitive or user-friendly as the downloadable TreeForm software; however, it may be more accessible to many students than the online phpSyntax program. When you go into the Treebuilder Playground, you'll see this:

LiOn Treebuilder Playground
The program automatically starts you with a top node of S; however, if you want to diagram something else--like a morpheme tree, for example--then you simply need to click on the box with the "E" (if you look closely, you'll see it actually says "Edit"). In edit mode, you can change the text for the top node. Every time you edit a node, you have to click on the green checkmark that appears next to the editing text box. Otherwise, it won't save any changes you made.

To add nodes below the top node, click on the "L+" or "+R" in the box. For the first node you add, it doesn't matter which of those you click. When you go to add a second daughter node, though, you need to decide if you want it to the left or right of the first one. As you add nodes, a tree will begin to form in the area above the top node box:

LiOn Treebuilder Playground: Building a diagram
As you can see in the screenshot above, the building space retains all the node boxes that you add--you can continue modifying the tree by adding more or taking away any existing nodes. When you add new nodes, make sure you are adding to the mother node--the trees in this program are built top-down. Once you've finished your tree, right-click on the tree diagram above all your nodes, and click on "Save image as..." to download the image to your computer. You can then insert that image into your document, like so:

LiOn Treebuilder Playground: Diagram
Again, this is more intuitive for many people than the system utilized by phpSyntax (with embedding through bracketing), but if you're able to download software, I still highly recommend using TreeForm. The LiOn Treebuilder Playground is a very handy tool to utilize, though, when you don't have the ability to download software (like when you're using a computer in the library).

The Tool Playground area of LiOn has many more useful tools that you may want to explore--it also has exercises for learning linguistic concepts, which is a nice feature for anyone learning more about linguistic analysis.

Tuesday, December 6, 2011

What the ....?

The post title sums up my reaction to the first time I saw these two sentences, both of which are supposedly sentences in English:

Buffalo buffalo Buffalo buffalo buffalo buffalo Buffalo buffalo.
James while John had had had had had had had had had had had a better effect on the teacher.
The first sentence relies on three different senses of the word buffalo: the city Buffalo, NY; the noun (the large mammal that once roamed the prairie freely); and the transitive verb, which according to my Mac dictionary means to "overawe or intimidate (someone)." The Wikipedia article on this sentence provides the background and some syntactic trees for the sentence, but I'll give you a shortened rundown here:

Let's start at the beginning: Buffalo buffalo work together to mean the NP "buffalo that are in Buffalo". This NP occurs three times in the sentence:

[Buffalo buffalo] [Buffalo buffalo] buffalo buffalo [Buffalo buffalo].
 The remaining instances of buffalo in the sentence are the verb form. The first instance of buffalo as a verb is working with the NP [Buffalo buffalo] to modify the first NP [Buffalo buffalo]. You might reword the entire first part of the sentence (this will take care of the first five instances of buffalo):

The buffalo that live in Buffalo that buffalo (other) buffalo in Buffalo...
Now the sentence is finished off with the transitive verb and its object, which also happen to be the buffalo in Buffalo:

The buffalo that live in Buffalo that buffalo (other) buffalo in Buffalo buffalo the buffalo that live in Buffalo.
Is it a sentence? Sure. By loose-ish standards. Is it a good English sentence? No. Why would Buffalo buffalo be buffaloing other buffalo that live in Buffalo two times over? That just doesn't make sense. So while it is syntactically possible, it's semantically void of really meaning anything. While it may not be a sentence you'd want to use in an everyday conversation, it is a sentence you can wow your friends with at parties. Just think of all the debates you can get into once you proclaim, Buffalo buffalo Buffalo buffalo buffalo buffalo Buffalo buffalo is too a sentence in English!

The second sentence from above only works with added punctuation. In fact, its Wikipedia article states that this sentence shows why punctuation can be necessary in some sentences to understand meaning. The sentence with its appropriate punctuation looks like this:

James, while John had had "had", had had "had had"; "had had" had had a better effect on the teacher.
Obviously, there was some sort of test, in which James wrote "had had" on the paper but John wrote "had", and the teacher preferred "had had" as the correct answer. All this took place in the past in a situation that required the past perfect to show that the activity was finished, thus leaving us with the seemingly (yet not) redundant pairing had had. In everyday speech, we often put the first had into a contraction, which sounds way less odd: I'd had three bananas before I realized that two would've been enough. That sentence just as easily could have started out with I had had three bananas... and been grammatically sound. That's what happens when a verb that has been grammaticalized as an auxiliary remains a main verb--have as an auxiliary (or helping verb) no longer has anything to do with its use as a main verb that usually (and loosely) shows some sort of possession (though "possession" doesn't even come close to fully describing the use of have as a main verb).

Again, is it a sentence in English? Yes. Is it one you're likely to come across? Not unless you're a teacher that left a blank on a test that should have been filled in with had had instead of had.

Do you know of any other crazy examples of sentences like these that people use to show off the oddities of language and syntax?

Thursday, September 2, 2010

Spotlight on Linguistic Tools: TreeForm

Last week I looked at an online program for drawing syntactic trees; this week I’m pointing the spotlight on a free downloadable software program called TreeForm. If you click on the link provided, you’ll see a short demo video, and you will see a link to its site on SourceForge for your free download of the program.

The best aspects about this program are that it is user-friendly and more intuitive for many students than the bracket notations. The only drawback is that you have to be able to download it onto your computer to use it (i.e., students using school computers may not be able to work with this program).

When you download it, be sure to install the entire TreeForm folder onto your computer. If you don’t install all the components in the folder, the program will be missing some of its images, which makes it a bit difficult to work with at times. Once you have the folder downloaded and installed on your computer, you are ready to use the program. It has three different icons for you to click on, depending on your operating system: .app for Mac, .bat for Windows, and .jar for Linux. If you try to open the wrong one for your computer, it simply won’t open. If that happens to you, try another.
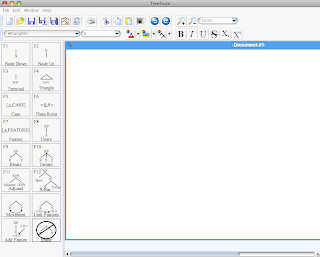
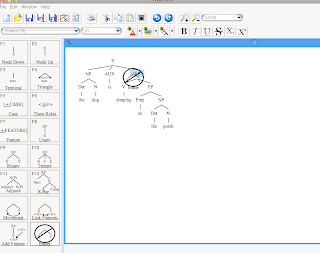
After you open TreeForm, you will see a screen that looks like this:

TreeForm screenshot


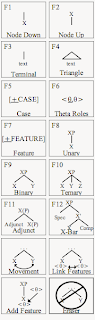
The large white area is your drawing board, and down the left-hand side of the screen you will find your “tray” of options:

TreeForm tray of options


Each button on the tray presents an option for you to choose. For example, click on the ‘Node down’ button on the tray and hold down your mouse as you drag the cursor into the white area. You can’t see the cursor in the following screenshot, but here is a picture of the ‘Node down’ being dragged into the drawing area:

Dragging 'node down' to the drawing board in TreeForm


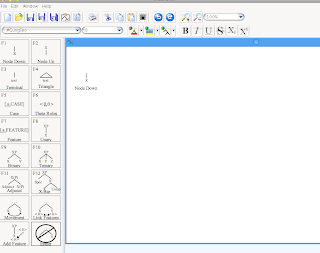
When you let go, an ‘X’ will appear on the screen. Double-click on that X to change it to any label you’d like. To build onto that node, you can either build up by selection ‘Node up’ from the tray and dragging it into the white area until the node you want to build on is highlighted. When you let go, a node will appear above the one you already had. Or you can build down by selecting ‘Node down’ and dragging that over to the screen. For instance, if you labeled the first node you put onto the screen ‘S’ (for the sentence level), then you could drag ‘Node down’ over until the S was highlighted and then release the mouse button. You would end up with a node below the S. To change the X that appears in the node, you simply need to double-click it and change the label. Let’s say you’ve labeled the first node ‘S’ and the node below it ‘NP’, and you want to add a sister node for the NP. To do that, you need to once again drag ‘Node down’ from the tray until the S is highlighted; this time when you release it, though, you will have two options for where you want to put the node:

Two options for node placement in TreeForm


If you want the second node to the right, you need to move your mouse over until the right-hand dot is illuminated green (as it is in the picture above) and click on it. If you wanted to add a third node at that same level, you do the same process you just did; only this time, you’ll have three options for placement (to the left of, in between, or to the right of the other two nodes).

Three options for node placement in TreeForm


Using that same process, you can easily build entire trees, putting in any labels you’d like by double-clicking the Xs. When you’ve reached what will be the terminal node (generally, the terminal node is the one where a word is inserted instead of a label), you can use the ‘Text’ button in the tray.

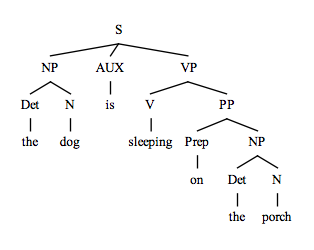
Syntactic tree using TreeForm


When your tree looks like what you want, you can go to ‘Edit’ and then ‘Copy tree’. Doing that puts the tree into your computer’s clipboard, which allows you to go to any document you’re working on and hit ‘Paste’ where you want the tree to go. Your tree will then appear in a typed document.


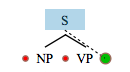
If you need to erase something, you can either hit ‘undo’ (or control-Z) if it is something you just did that needs to be undone or use the ‘Eraser’ button in the tray. To use the eraser button, click and hold down on it, dragging it over to the drawing board area. Move it over the tree until the highest node you want erased is highlighted.

Dragging the eraser and highlighting the VP node in TreeForm


When you release the eraser, that node and everything below it will be erased.

Tree from above with its VP erased in TreeForm


Using those four buttons (node down, node up, text, and eraser), you can create basic tree structures. The other buttons in the tray are for more advanced tree structures. If you play around with the features, you’ll find that you have a lot of leeway with the program and the look of your trees. You can change the font, the colors of individual nodes, the colors of branches, and more. On top of all that, you can easily use TreeForm to create any type of hierarchical tree you need: Instead of putting syntactic labels in the nodes, put anything you’d like:

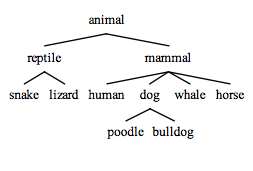
Non-syntax hierarchical structure created using TreeForm


Just like with phpSyntaxTree, the best way to figure out what the program is capable of is to play with it. Go have some fun with TreeForm!

Wednesday, August 25, 2010

Spotlight on Linguistic Tools: phpSyntaxTree

If you ever find yourself in need of diagramming a sentence in a typed document, you may have noticed that not too many word processing programs have user-friendly ways of drawing and inserting trees. One way to work around that issue is to use the free online phpSyntaxTree program, which draws trees based on bracket notations. A few advantages to phpSyntaxTree are that the program is free, online (i.e., you don't have to download anything to use it), and provides an easy-to-work with picture file as its end product.

When you go to the web page, you will see something like this:


The text box on the website comes pre-programmed with this sentence already in bracket notation: [S [NP phpSyntaxTree][VP [V creates][NP nice syntax trees]]]. If you hit the "draw" button directly below the text box, you will go to a new screen that looks like this:


Once the tree is drawn, you can play with the settings across the top (e.g., take out the color, take out subscripts). When the tree looks like what you want, you can simply put your mouse over the diagram and click on it; it will download a copy of that diagram as a picture file (.PNG) to your computer, and you can then insert it into whatever document you're working on.

Once you've got the process down, it flows pretty nicely, and you can create diagrams of any kind (i.e., with any labels) to put into the text box on the website. The problem is that not all students are familiar or comfortable with using bracket notations.

For this program, the basic concept is what appears on the left inside the brackets is inserted in the mother node and what appears on the right is the daughter node. A space between the entries is interpreted as a branch or triangle. For instance, if you put [N dog] into the text box and hit the draw button, you will see a tree like this:


If you put [NP the dog] into the program, you will get a tree like this:

The first space after whatever entry you put at the left will be interpreted by the program as the separation between what is put on top (the mother node) and what is put on bottom (the daughter node). If more than one word appears in the daughter node, a triangle is used instead of a single branch (unless you turn off the triangle notation, in which case a single branch is inserted with several words below it).

Putting this concept to work in layers, you can put notations like [S [NP [Det the] [N dog]] [VP [V sleeps] [PP [Prep on] [NP [Det the] [N porch]]]]] and get results like this:


The program keeps track of your open and closed brackets; if the numbers are not equal, the program will not allow a tree to be drawn. If you break down the sentence in its bracket notation and compare it to its tree, you will see that the basic concept of "left side = mother node" is followed throughout: [NP [Det the] [N dog]] tells the program that NP should appear in the mother node, the mother node has two daughters (Det and N), and that those daughter nodes in turn have daughter nodes (the and dog).

Let's look at that sentence a little more closely. If you type [S the dog sleeps on the porch], you'll get a tree like this:


If you want to break that single node into two, you need to put words that go together in brackets: [S [the dog] [sleeps on the porch]]. Now you're telling the program to have two branches under S (branch 1: the dog; branch 2: sleeps on the porch). But if you hit "draw" right now, you'll be left with this:


Why did that happen? Because the program doesn't distinguish between words and labels unless you put them in their appropriate places. So the program read [the dog] as the is the mother node and its daughter is dog. The same applies to the other set of brackets. You can fix this by inserting labels for both of these: [S [NP the dog] [VP sleeps on the porch]].


From there, you can continue breaking it down until you get the tree with a complete break down. Just remember that what is on the left is inserted into the mother node, a space after that entry indicates a branch/triangle, and more than one branch from a single mother node is indicated by sets of brackets. For instance, [NP [Det] [Adj] [N]] will look like this:


Separating the entries into brackets told the program "don't interpret this as a single unit but rather as three separate daughter nodes."

Once you get the hang of using bracket notation, getting the tree structure you want becomes easier. I encourage you to play with the program to see what different structures look like in their bracket form and compare that form to its tree form. Playing with the program is the best way to learn it.

Next week I will showcase another way to get tree diagrams in typed form to insert into documents. In the meantime, I hope you will have some diagramming fun with phpSyntaxTree.